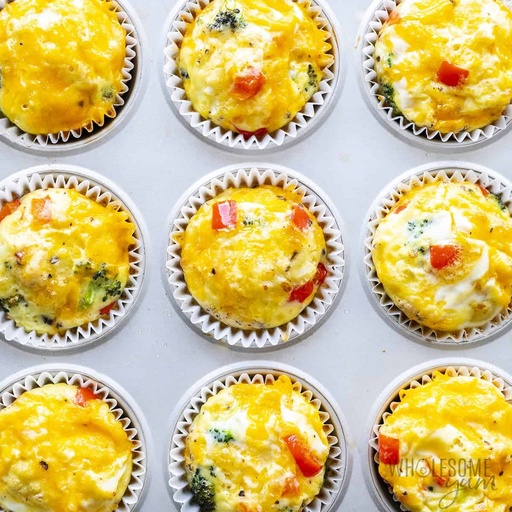
Healthy Recipes
The Perfect Blend of Health and Flavor
Responsible | Lina Cakoncheva |
---|---|
Last Update | 12/25/2024 |
Completion Time | 2 hours 21 minutes |
Members | 2 |
Healthy Recipes
View allCauliflower Soup
Make this easy roasted cauliflower soup recipe with just 6 simple ingredients! It's creamy, thick, and will warm you up on a cold day.
As soon as the weather turns cool, I get obsessed with this easy cauliflower soup recipe! Even my kids love it. This roasted cauliflower soup is creamy, velvety smooth, full of flavor (just like cream of asparagus soup), and the hands-on cooking time is short, so I can prep the main dish for dinner while I wait.
Ingredients & Substitutions
- Cauliflower – You’ll need about 6 cups of raw florets, so choose a large head, or two smaller ones. You could also use leftover air fried cauliflower. If you have extra cauliflower, use it in a vegetable soup recipe next.
- Oil – I used olive oil for roasting the cauliflower and sauteing the garlic. Avocado oil works fine, as well. For extra flavor, you can also use butter instead of oil for sauteing the garlic, since this is quick and the butter won’t get the chance to burn.
- Garlic – Fresh minced garlic cloves have the best flavor, but you can use 2 teaspoons of jarred minced garlic instead.
- Fresh Thyme – Adds flavor! Feel free to experiment with other herbs here; rosemary, chives, or Italian seasoning also work well. If you replace the fresh thyme with any type of dried herbs, use 1 teaspoon dried herbs in place of 1 tablespoon fresh herbs.
- Broth – I use a reduced-sodium stored-brought or homemade chicken broth to control the salt to taste. You can also use chicken bone broth, or use regular chicken broth and decrease the amount of salt in the cauliflower soup recipe. Vegetable broth works as well, for a vegetarian option.
- Cream Cheese – Makes this a creamy cauliflower soup! Cut the cream cheese into small cubes to melt into the soup more easily. If needed, you can use a vegan / dairy-free cream cheese, or substitute coconut cream, though the flavor will be different.
- Sea Salt & Black Pepper
How To Make Cauliflower Soup
- Season the cauliflower. Cut the cauliflower head into florets. Place them in a large bowl and toss with olive oil, salt, and pepper.
- Roast the cauliflower. Line a large baking sheet with foil (or parchment paper) and grease lightly. Roast the cauliflower in the oven, until tender and browned.
- Saute the garlic and herbs. Heat more olive oil in a large saucepan, pot, or Dutch oven over medium heat. Add the garlic and thyme. Saute until fragrant.
- Simmer the cauliflower soup. Add the chicken broth and roasted cauliflower. Bring to a boil, then reduce heat and simmer to let the flavors develop.
- Blend until smooth. You can use an immersion blender to puree the cauliflower. If you don’t have an immersion blender, you can blend the soup in batches in a regular blender, and then return to the pot.
- Make it creamy. With the soup on low heat, add the cream cheese cubes. Use the immersion blender again to help the cream cheese melt into the soup, until smooth.
- Season to taste. Adjust taste with salt and pepper if needed. I like to garnish cauliflower soup with fresh thyme leaves, sometimes a drizzle of olive oil, and extra freshly cracked black pepper.
Egg Muffin Cups
This breakfast egg muffin cups recipe with veggies or meats, eggs, and cheese has 15 flavor options! Healthy, low carb and easy to meal prep.
Make one batch of my egg muffin cups and you’ll never want to live without them in your fridge again! Sometimes called breakfast egg muffins or mini frittatas, they make the most amazing meal prep healthy breakfast for busy days — whether you’re rushing out the door or rushing to your home office like me. Pair them with my bulletproof coffee for a filling, protein-packed morning meal. I even have a formula of ratios for you, so you can customize them to your heart’s content.
If you prefer the egg yolks and whites separate from each other, try my baked eggs in a muffin tin (very similar to these egg muffin cups, but not scrambled), or cloud eggs instead.
Ingredients & Substitutions
- Eggs – I prefer to use whole eggs, but egg whites alone work fine. To do this, replace each large egg with 3-4 tablespoons of egg whites (about 1.5 egg whites).
- Milk Or Cream – Helps the eggs get fluffy! I love the richness of heavy cream, but you can swap it for any milk of your choice, such as regular milk, half and half, coconut milk, or almond milk.
- Cheese – I use shredded cheddar most often. You can also try mozzarella, Gruyere, feta, or any other cheese you like. For a dairy-free option, simply omit the cheese (and use almond or coconut milk above).
- Fillings – I used broccoli, cauliflower, and bell peppers in the pictures and the egg muffin cups recipe card below, because that’s what I had on hand. Make it your own by choosing your favorite veggies (fresh or frozen both work fine!) and/or meats. I often make these with cooked crumbled sausage, diced ham, or chopped oven bacon instead of some of the veggies.
- Aromatics – Not required, but I love adding some minced garlic… because, um, I add it to everything. Caramelized onions would also be a delicious addition. For convenience, you could just whisk in 1/2 to 1 teaspoon of garlic powder or onion powder directly into the egg mixture.
- Olive Oil – For cooking the vegetables. Avocado oil works great, too.
- Sea Salt & Black Pepper
How To Make Egg Muffin Cups
- Cook the add-ins. Toss the broccoli, cauliflower, red pepper, and garlic (or any other vegetables you are using) with the olive oil. Spread out in a single layer on a baking sheet and roast until edges are browned. If you’re making your egg muffin cups with bacon, sausage, or other meats, pre-cook these as well.
- Prep the pan. Line a muffin pan with parchment paper liners or silicone cups. (You can also just spray with cooking spray, but liners make the muffins easier to remove and more portable, and require less cleanup.) Divide the roasted vegetables among the cups.
- Whisk the egg base. In a large bowl, whisk together the eggs, heavy cream (or milk of choice), sea salt, and black pepper. Stir in cheese of your choice. Pour the mixture into the muffin wells. (Alternatively, you can sprinkle the cheese over the other fillings and then pour the rest of the egg mixture on top.)
- Bake. Your egg muffin cups are ready when the eggs are set! Just be careful not to overcook them.
Recipe Tips & Notes
- Always pre-cook your fillings. Whether you are adding vegetables, meats, or both, you have to cook them first. If you don’t, raw meats won’t cook through properly and raw veggies will turn your egg muffin cups into a soggy, watery mess.
- You can pre-cook any way you want. I prefer roasting the vegetables because it imparts so much flavor, but any cooking method (steaming, boiling, or sauteing in a skillet) will also work. Be sure to pat dry if steaming or boiling.
- Use up leftovers. Like my chicken bacon ranch casserole, this recipe is a great way to clean out your fridge! If you have any leftover veggies or meats that are cooked from another dish, feel free to throw them in.
- Deflating a bit is normal. The air bubbles in the egg expand while baking, and they deflate as they cool. One way to reduce this effect is to let the muffins cool more slowly, so keep them in the pan to cool before removing them. I still love them even when they do shrink!
Baked Salmon Recipe
This easy oven baked salmon recipe is flaky, moist, and flavorful! Make it in just 15 minutes with olive oil, lemon, garlic, and fresh herbs.
Oh, baked salmon. It’s the healthy dinner that can — and does — do it all. It’s my busier-than-ever-weeknight dinner. It’s my I-have-guests-over dinner. It’s my I-want-something-light dinner. It’s my I-don’t-feel-like-cooking dinner. Sometimes it’s even my holiday dinner. This oven baked salmon recipe is the every possible occasion staple that I make over and over. Make it with me!
Salmon Tips:
- Try to get skin-on salmon if you can — it gives the fish the best flavor, even if you don’t eat the skin. But skinless is just fine if that’s what you’ve got.
- You can make baked salmon recipes with pretty much any species of salmon. Sockeye or farm-raised Atlantic salmon is the most affordable. I love using wild-caught pink salmon, Coho salmon, or for a treat, king salmon is the very best. You can even use steelhead trout.
- Though you can bake a whole salmon fillet, individual 6-ounce fillets are my favorite way to cook salmon in the oven, because they cook more evenly — and a little faster, too.
Other Ingredients:
- Olive Oil – Oil ensures that the fish stays moist and flavorful. You can also use avocado oil, or even unsalted melted butter.
- Lemon Juice – Use fresh lemon juice for the best flavor, or bottled for convenience. I try to use fresh lemons for this, as I place extra slices on top of the fish for a flavor boost and presentation.
- Garlic – You can mince or crush fresh garlic cloves, or use the jarred kind (I always have some in my fridge). If you don’t have either, you can substitute 1/2 teaspoon of garlic powder, though I think it’s a downgrade.
- Fresh Herbs – I used fresh dill and fresh parsley in my baked salmon recipe, but thyme would also go nicely. I don’t recommend dried herbs, but if that’s all you have, use 1/3 the amount of fresh.
- Sea Salt & Black Pepper
How To Bake Salmon In The Oven
- Mix the oil, lemon, garlic, and fresh herbs. Just stir or whisk them together in a small bowl.
- Brush it on the salmon. Place the salmon in a baking dish (I use this one) or on a baking sheet, with space between the fillets. Pat the fish dry with a paper towel, then brush with olive oil mixture on both sides. I season with salt and pepper at this point (rather than mixing them into the oil mixture), because these are so important to be evenly distributed. If you like, place thin lemon slices on top of each fillet.
- Bake salmon. Place the salmon in the oven and bake until it flakes easily with a fork. (For best results, see my tips and temp chart below!) I like to sprinkle more fresh herbs on top for serving, and drizzle with the sauce from the bottom of the baking dish. It makes the fish even more moist!